![]() "Mordred's Supply Wagon"
"Mordred's Supply Wagon"
A Flintloque Scenario by Conrad EJ Gonsalves
Elven forces in Southern Catalucia suffer from supply problems and a critical supply train has been ambushed by Dark Elf guerrillas assisted by Orc Intelligence reports. However the delivery of the supply wagons to the Orc camp has not yet arrived. Can Mordred's finest retrieve what is rightfully theirs?
~
Mordred's Imperial Elf forces are suffering from supply problems in Southern Catalucia. Ammunition is in short supply (but don't tell the Orcs!), as well as other necessities during this hard war. As such Mordred's forces are dependant on the arrival of supply trains.
One such critical supply train bound for Mordred's Imperial Elves was ambushed recently by Dark Elf guerrillas. The ambush was actually planned by the Orc Commanding Officers and was further assisted by Orc Intelligence reports regarding the nature and route of this supply train. In return for the help of the Orcs, the Dark Elves were meant to deliver some of the supply wagons to the Orc camp. This was meant to happen 2 days ago...
In the meantime, the Imperial Elves must recover some or all of this vital supply train to allow their forces to continue to fight in this area or risk having to retreat.
Intelligence reports available to all parties concerned show that the supply train has in fact been split down into single wagons accompanied by a small number of Dark Elf guerrillas as an escort. This tactic has obviously been adopted to ease the transport of the supplies to it's destination - wherever that may be.
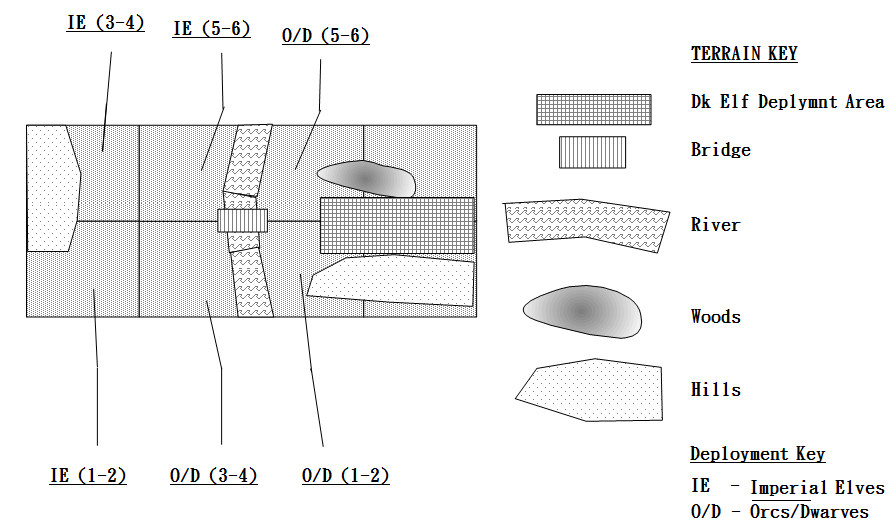
This skirmish scenario represents the recovery of one such supply wagon and takes place on a battlefield with terrain as displayed in the following diagram.
~
~
The Imperial Elves
Forces
6 Dragoons - armed with lances and sword.
8 Chasseurs - armed with musket, sword and a pistol.
Senior NCOs should carry no musket but 2 pistols plus sword.
Mission Objective
To recapture the supply wagon and get off the table with it
Deployment
See Map on previous page - IE= Imperial Elf Deployment Area. Roll d6 and deploy in the relevant area as per the map.
Special Rules
The Imperial Elf forces are short on gunpowder and as such are limited to the number of rounds that they can fire. Roll a d6. This represents the amount of gunpowder and hence the number of rounds that each figure may fire for both Imperial Elf units. e.g. The Imperial Elf player rolls a 2 on a d6 - this means that the Imperial Elves has 2 shots per figure, this could be 1 musket shot and 1 pistol shot or 2 muskets, it is up to the player to decide - obviously 2 shots is not very good in these circumstances. The Imperial Elf player will need to note how many shots each figure has fired per weapon before the particular figure is then reduced to hand-to-hand combat only. ( Sorry about the additional record keeping but it does add to the flavour of the game).
~
The Dark Elves
Forces
8 guerrilla infantry - armed with musket and sword
4 mounted guerrillas - armed with lances
Mission Objective
To get off the opposite board side (ie opposite the Imperial Elf deployment side) alive with the supply wagon
Deployment
See Map on previous page - may be deployed anywhere in the marked Dark Elf deployment zone but must be at least 50cm away from the bridge.
Special Rules
The Supply Wagon contains the following:
2 cases of muskets, one barrel/case of musket balls, 6 large kegs of gunpowder and lengths of fuse. Barrels may be carried by one figure. Should the fuses need to be used with the gunpowder for explosive purposes then declare how long the fuse should burn for eg. 1 turn, 2 turns, the end of this turn etc., roll a d6 as soon as the fuse is light. There is a base 50% chance that the fuse is the correct length ( ie 1-3 on a d6 roll ) and the explosives go off as desired. Otherwise roll another d6 and consult the table below for results as to what has happened:
D6 Result Lighting Fuse Result
1 The fuse is too long and will explode in 1d3 turns time. Of course someone may have put the fuse out by then !
2-3 The fuse goes out. You must spend another turn preparing a new fuse OR you may relight the existing fuse but if you do so then you must roll on this table again and add +1 to the die roll as a modifier.
4-5 The barrel explodes successfully.
6+ The fuse is much too short and burns very quickly, the barrel explodes as soon as the fuse is lit. Any figure within 10cm of the barrel takes 1d3 wounds.
~
The Orc and Dwarf Forces
Forces
8 Orc Riflemen - armed with Bakur Rifles and sword.
8 Krautian Dwarves.
Mission Objective
To capture the supply wagon and get off the table with it.
Deployment
See Map on previous page - D/O= Dwarf/Orc Deployment Area. Roll d6 for each unit and deploy in the relevant area as per the map. This may cause the Orc and dwarf units to be deployed in different areas.
Special Rules
Communications: At the start of the game and before deployment, the players controlling the Orc and Dwarf forces are allowed to discuss a general strategy to obtain the supply wagon. In fact, it may well be worthwhile writing orders down for each unit, that both players have agreed upon. After this is completed, the controlling players should pick a figure to represent themselves in the relevant Orc or Dwarf unit. Once the units are deployed, the players controlling the Dwarf and Orc units are not allowed to talk to each other unless the corresponding figures are in base to base contact with each other on the table-top and as such the Dwarf and Orc units may have to fight independently of each other based on there original orders/strategy.
The Orc commander is in fact in command of the Dwarf unit and may attempt to shout orders to the Dwarfs. Should this attempt be made, the Orc commander rolls a d6 - this represents the level of noise on the battlefield. The Dwarf commander rolls a d6 as well, this represents his ability to hear over the noise of the battlefield. If the 2nd d6 roll ( i.e. the Dwarf's ) is equal to or higher that the first d6 roll ( i.e. the Orc's ), then the Orc commander may convey a message to the Dwarfs and the Dwarf unit can react accordingly. Obviously if the 2nd d6 roll is lower than there is too much noise on the battlefield and the Dwarf commander cannot hear the shouted order.
Further Scenario Notes
Deployment / Terrain
The only way across the river is via the bridge. There are no fordable river sections.
All forces except the Dark Elves should deploy within 20cm of any relevant table edge based on the deployment areas rolled.
Movement of Cart
2 men or 1 horse can pull the cart/wagon without any movement restrictions bar the following listed below.
If 1 man moves the cart, then he can do so only at his/her crawl movement rate.
If a horse is hitched to the cart, the cart does not get a charge movement rate. Should the cart be moved at a run movement rate when being pulled by a horse, there is a base 10% chance per turn that a wheel will come loose on the cart - role half way through the cart's run move each time the cart moves at the horse's run rate.
Movement When Carrying a Barrel
There is a -25% movement allowance when carrying a full barrel.
Turn Sequence
The turn sequence for the first turn should be - Dark Elves, Imperial Elves, Orcs and finally Dwarves. For subsequent turns this should be rotated i.e. Turn 2 Imperial Elves, Orcs, Dwarves and Dark Elves, Turn 3 Orcs, Dwarves, Dark Elves and Imperial Elves etc.
~
Webmaster's Notes
This scenario was first published back in the 90s on The Forlorn Hope, the Flintloque pages of Conrad EJ Gonsalves' long since gone wargaming site, Tanelorn. Conrad has given permission to reproduce this scenario on Orcs in the Webbe and was kind enough to email me the original Word Perfect documents which included the original map you can see above, Conrad is still involved in the world of wargaming, click on the his name tag below and to the left to find out more.
It was first published here on Orcs in the Webbe on the 25th April 2014 as part of it's ongoing Flintloque Archive Project and the map was added on the 12th May 2014.
~