![]()
![]()
"NUTS: 1st Mission AAR"
An After Action Report by Craig Andrews
Read about how Craig's Commandos got on in thier first mission in this After Action Report using the upcoming Two Hour Wargames World War 2 ruleset, NUTS: Final Edition.
~
I’ve been playtesting Two Hour Wargames’ upcoming 2nd World War ruleset “NUTS: Final Edition” and Ed asked me to post my AARs so here’s the first one. It’s more of a narrative scrawl through my experiences. I write these AARs as I play with only a little editing before posting so they are a bit of a jumble. I have added comments in [[ Red ]] where they're not part of the AAR or where I realise afterwards I did something wrong.
This was one of my first forays into World War II wargaming outside of Ambush! and Heroes of Normandie and I wanted to learn a bit more about it. After reading through the rulebook I decided I wanted to play a section of British Commandos and after a bit of web research I decided to base my first NUTS campaign in Norway 1941 as it’s not a part of the war I’d read about before. NUTS: FE is based in 1944 but the framework is loose enough to set it anytime during the conflict. I’m using the historical Operation Claymore as a guide only, I’ll be generating all my missions using the campaign structure in NUTS.
The basic squad creation rules are concise and well detailed allowing you to play as Germans, British, Russians or Americans.
I don’t have any World War II figures so I decided to use the Roll20 ‘virtual tabletop’ website for my games as I’ve been using it for a number of other Two Hour Wargames rulesets. A quick visit to the Warlord Games Bolt Action website and I had enough images of 28mm British Commandos and German Infantry to create some digital miniatures using the free GIMP image editing software. If I take to WWII I might invest in some miniatures or I might see if the rules lend themselves to the Heroes of Normadie flats (some tweaking would be needed as they mostly represent 2-5 infantry per tile).
With NUTS: FE your first Mission is always a Patrol Mission. The campaign structure uses a clever mechanism of tracking how well your and your opponents faction is doing in the local Operation as well as how invested they are in its outcome.
At the start of my campaign things look like this:
British Campaign Morale: 4
British Investment Level: 3 (reduced to 2 as I’m on a Patrol Mission)
German Campaign Morale: 4
German Investment Level: 3
[[ I decided not to use skills or the Outgunned rule for my first mission. Well, I decided not to use skills but forgot about Outgunned completely until the end. ]]
Playing the Game / Creating my Squad
As I said I play most games these days using virtual tabletop software. For THW rulesets I mostly use Roll20 as the macros you can program in really help speed dice rolls up as they handle targets, modifiers etc. First up I altered the Blank 5150 Character Sheet I’ve used in the past into a Blank Nuts Character Sheet and entered all my squad details. Roll20 is quite intuitive once you’ve set it up correctly and as NUTS:FE uses the same system as 5150: Urban Renewal I was ready to go within twenty minutes. I named my squad Craig’s Commandos (no points for originality).
Terrain
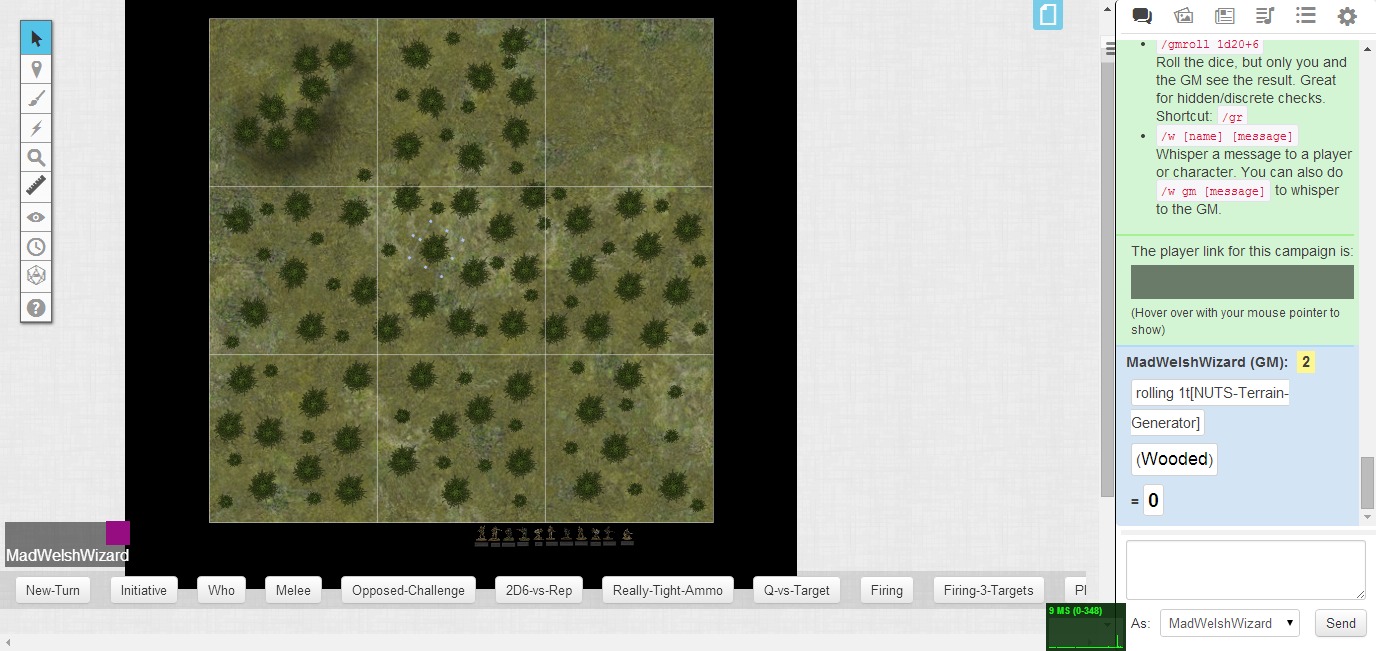
The entire table in NUTS:FE can be generated randomly if you so desire, as Roll20 is digital I’m not limited to scenery I ‘own’ so I rolled for terrain using the tables in NUTS. I got woodland as the overall terrain type and as it’s Norway I used fir trees :) (these I found using Roll20’s built in image search engine). Every section except 1 and 3 got woodland. 1 is a wooded hill and 3 is clear.
Going back to the Mission brief, I see takes place during the day.
Checking the rules for Patrol missions I see I enter the table then place the PEFs (see below if the term is new to you)..
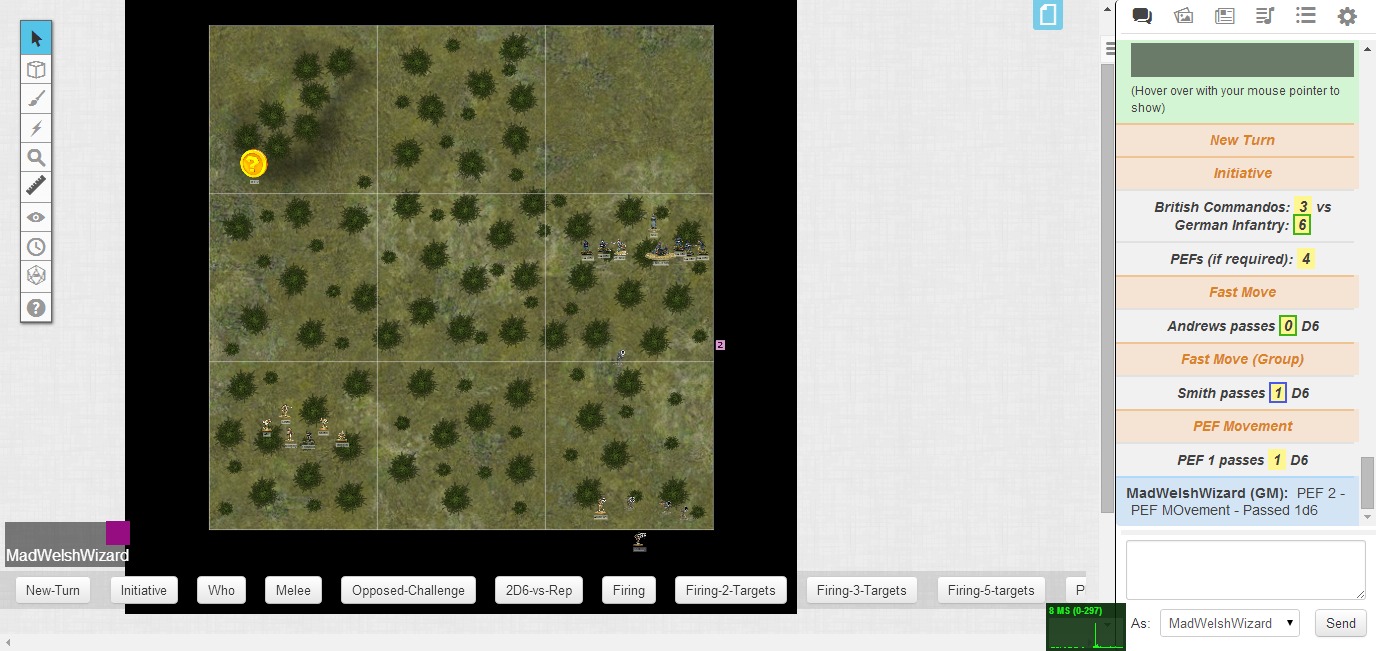
I decided to split my squad in two. One half under Lt Colonel Andrews (my Star) is going to head up the Eastern edge (9 - 6 - 3) and my Jr. NCO Smith is going to move up the Western side (7 - 4 - 1 ). The LMG team is going with Andrews.
You can just about see my initial deployment in the screen capture above. I then generated PEFs.
[[ PEF stands for Possible Enemy Force and is one of the reasons I think THW rulesets are bloody brilliant especially for solo and co-op play. They are tokens that move around the battlefield based on intuitive criteria (not weird random movement as with some solo rulesets). When your section comes into Line of Sight with them you resolve them against tables in the book and depending on the scenario they could be a number of things including enemy forces, or simply a false alarm. ]]
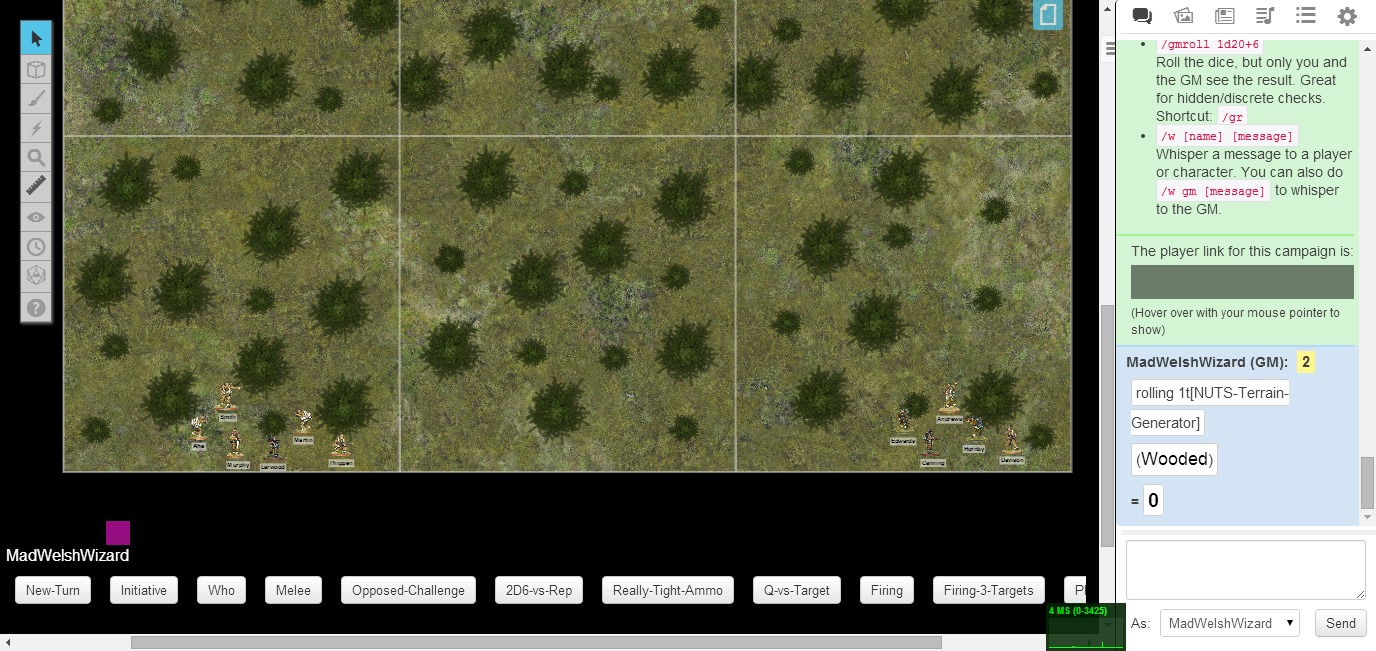
I rolled randomly as per the rules and placed my PEFs on the table.
My AARs are usually either too detailed that they slow down the game or I get caught up playing and forget to update things. From here on in it’s more of a random smattering of text every time something happens as opposed to a step by step AAR.
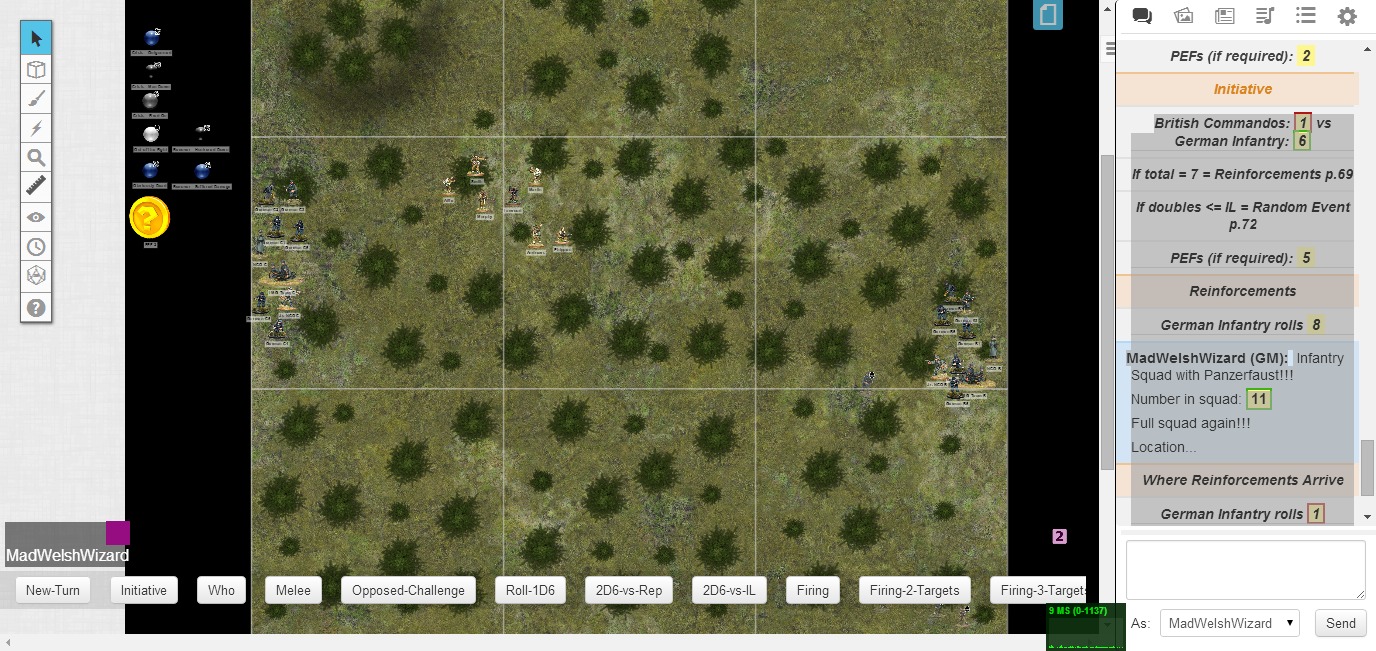
I completed a few turns of activation, sadly my commandos didn’t get to move once. PEF 3 revealed itself to be an Enemy Defensive Position. A few dice rolls later and I discovered it was a full German Infantry squad including an LMG. Bugger. I placed them in an 8 inch line and both groups rolled for In Sight. My guys passed 0D6 so stood still as the German ambush cut them to ribbons. Edwards was the first to fall with an OD result (skull & crossbones Icon next to figure image), Andrews was missed, Canning was knocked down but could carry on when next active, but Hornby and Davison were taken out of the fight (black mask icon next to figure). Both Andrews and Canning spectacularly failed the Crisis test getting a Leave the Battlefield result.
[[ Having spoken to Ed and read the rules again I played in Sight a little bit wrong, in NUTS:FE only the side that wins the In Sight gets to take it’s actions. ]]
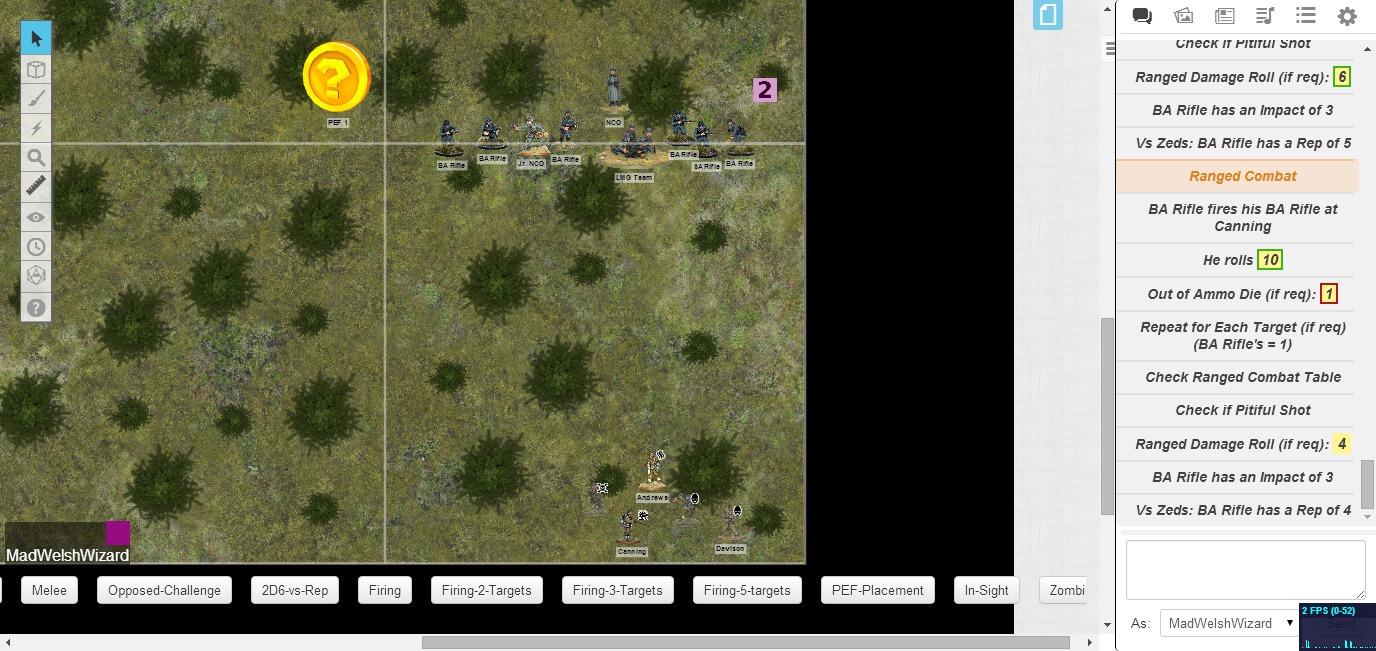
As Canning was about to leg it straight off the table I decided Andrews wouldn’t go down without a fight and chose to return fire. He took down a German soldier! Huzzah!
Now In Sight was over I switched back to normal turns. We need to find out what the Germans mission is… I rolled a [1] - They are on a Patrol too! They passed 0d6 so decide to make a fighting withdrawal (I decided they’d do so off the North edge of the map).
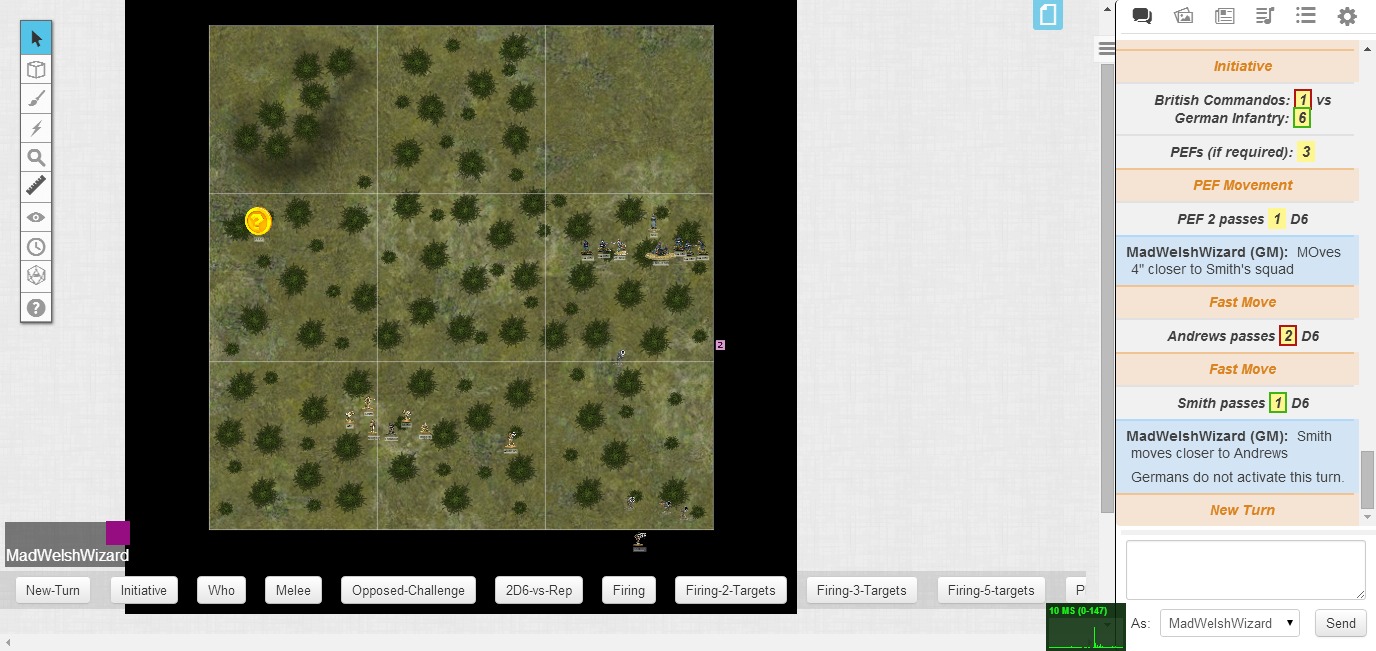
This turn also saw some PEF movement and Andrews tries to rendezvous with Smith’s squad who is still advancing through the western woods.
Another activation and Andrews and Smith’s teams continue to try and meet up. The Germans didn’t activate. Meanwhile that PEF is getting closer…
There were a few more turns with my guys slowly slogging North through the forest. The German patrol withdrew from the Northern edge. After that it was uneventful for a few turns as I managed to patrol sectors 1 and 2 (as per the Mission brief). I got a bit into the game at this point and forgot to take any screen caps.
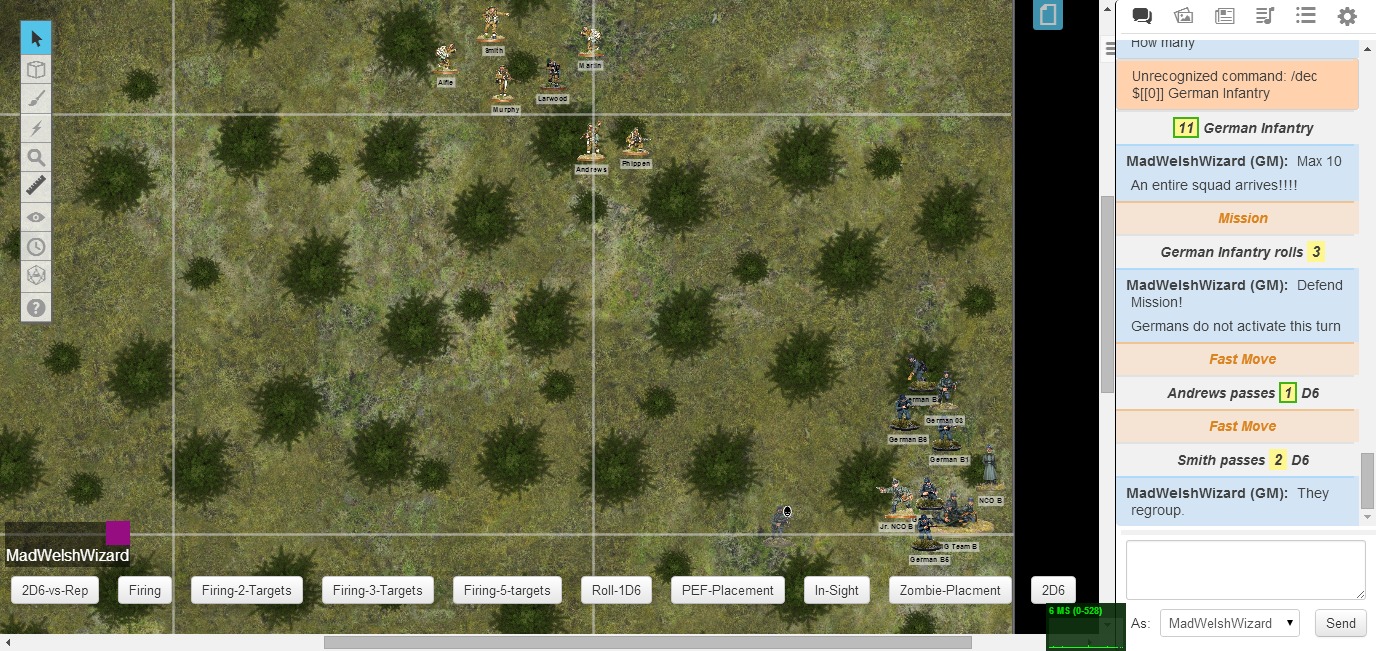
When I was patrolling Sector 3 however the Germans rolled reinforcements and an entire full squad appeared 13 inches up the eastern edge. Right where the initial defensive position had been.
As always happens in THW games the storyline wrote itself. Plot-wise they were probably a second squad checking up on the first squads lack of contact. But they could also be an enemy force trying to cut me off. What was their mission?...
[[ I wasn’t sure if I should roll again or use the same mission as the first squad? To make the game a bit more random I thought it’d be more fun if each new squad had different orders. ]]
I rolled that they are on the defensive.
Plot: Perhaps there’s something off to the East worth checking out in the future.
Next turn they dug in (i.e. they didn’t activate - perhaps they are searching for signs of the initial squad.)
I managed to regroup, possibly getting a bit too close to the Germans whilst doing so.
[[ I realised afterwards this should have triggered an In Sight. ]]
My plan at this point is to scarper as quick as you like down to the south/western edge of the table.
Next Activation. Argh! Germans got reinforcements again as I was scarpering and they came out on the left side right in the middle. It’s like it was planned! They’ve popped out right by me and an In Sight is triggered! This could be it for Andrews Squad…
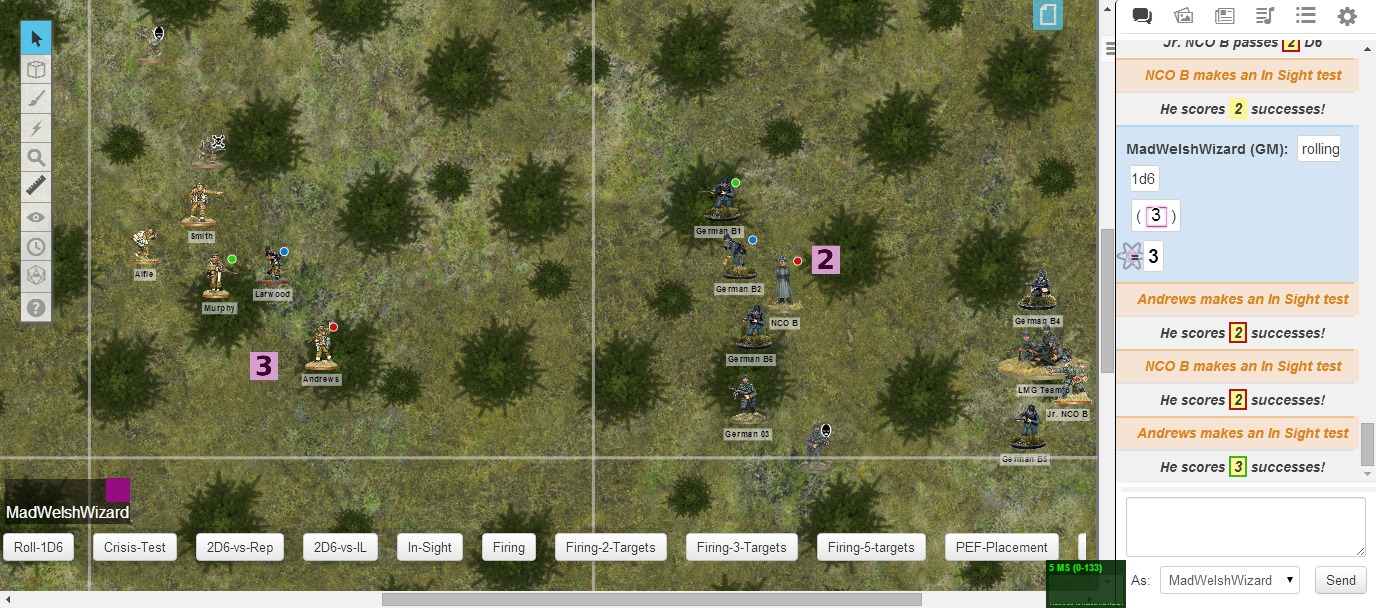
So then, here’s a close up of how things look before the In Sight…
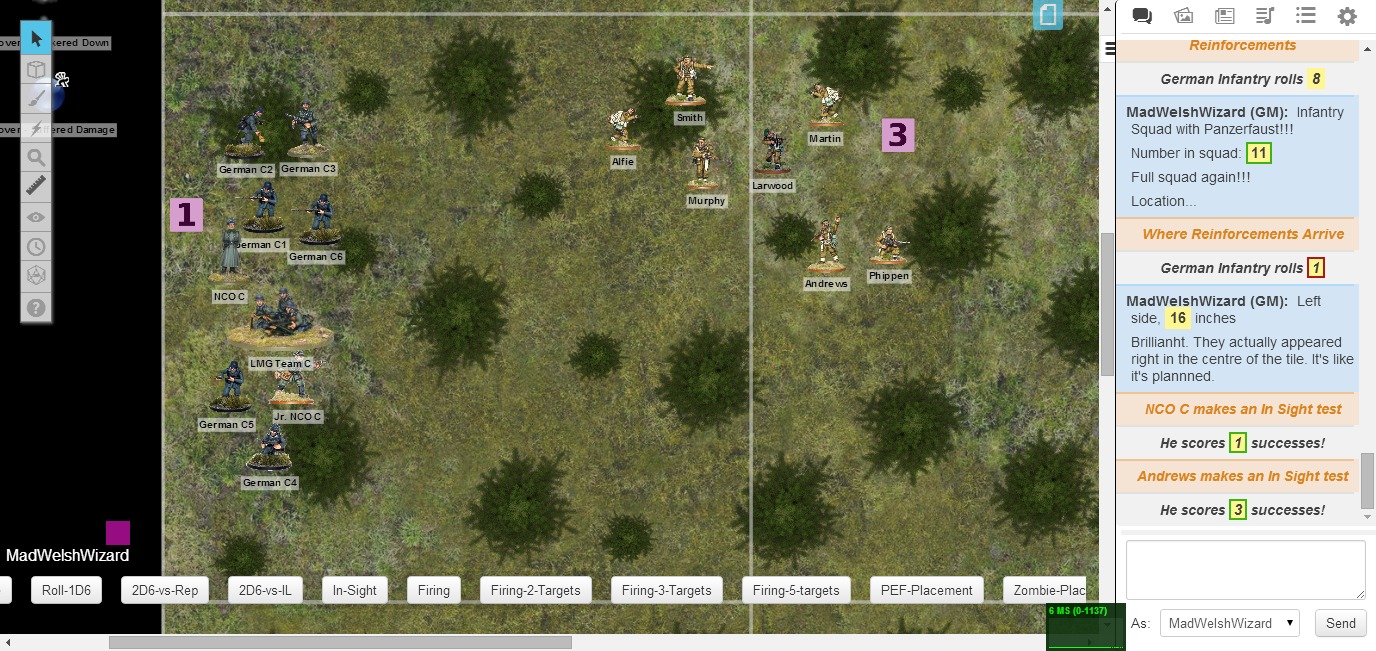
The Germans triggered the In Sight I think as they ‘appeared’ at the table edge. They are going to move 2” closer to me.
[[ I wasn’t sure if they were considered Active and Moved? I thought yes at the time but in hindsight I think they weren’t. ]]
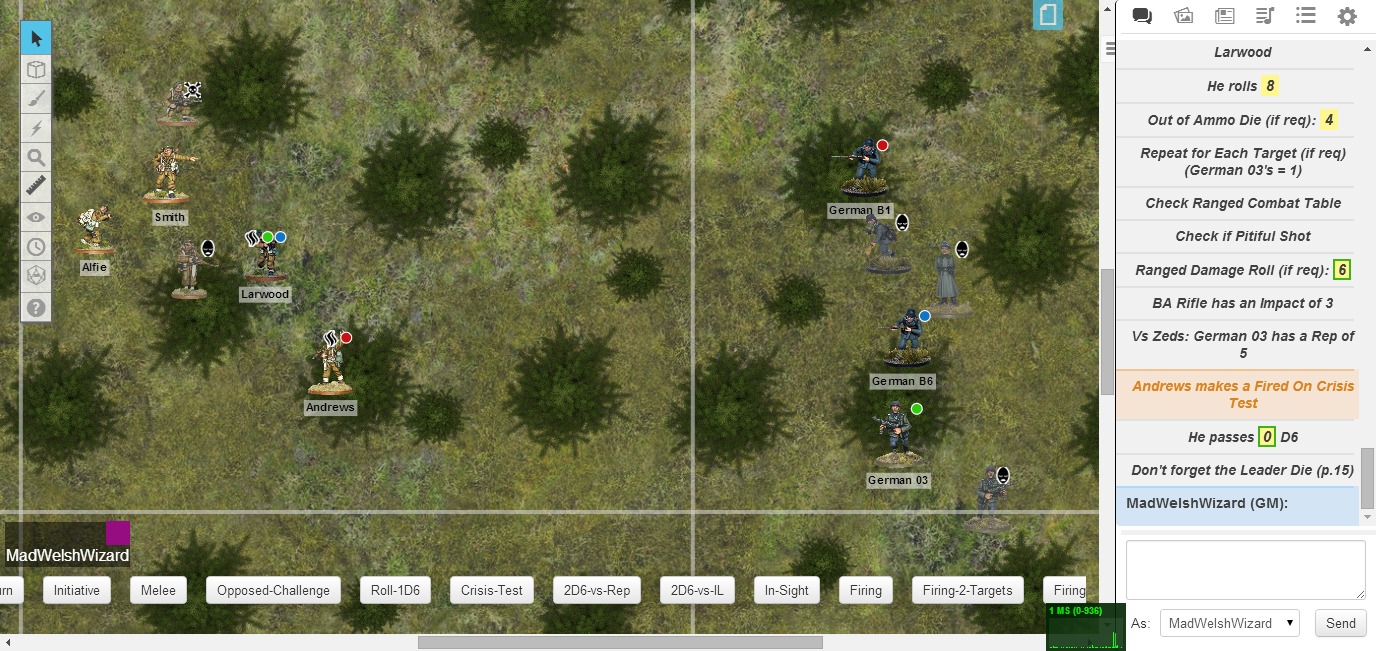
I won the In Sight (3 vs 2) so I get to go first so firing targets are assigned (matched coloured dots).
[[ Again, In Sight was wrong but it didn’t stop the game being fun, it was justa bit more lethal than it should have been :) ]]

My In Sight is over. There was quite a bit of gunplay and here’s how things look before the Germans return fire…
The greyed out figures with black masks and no name tag means out of the fight, the crouching symbol with arrows means knocked down but can carry on next activation.
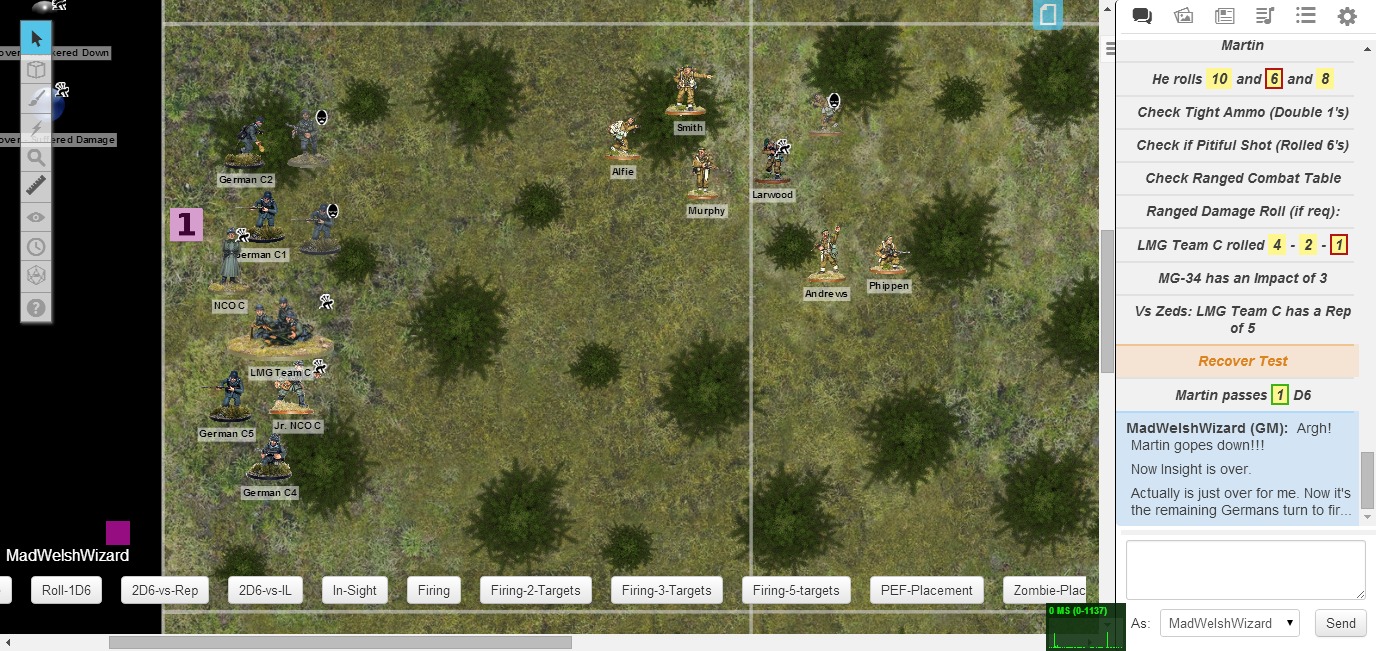
Time for the German part of the In Sight - There are 5 Germans who can shoot me back…
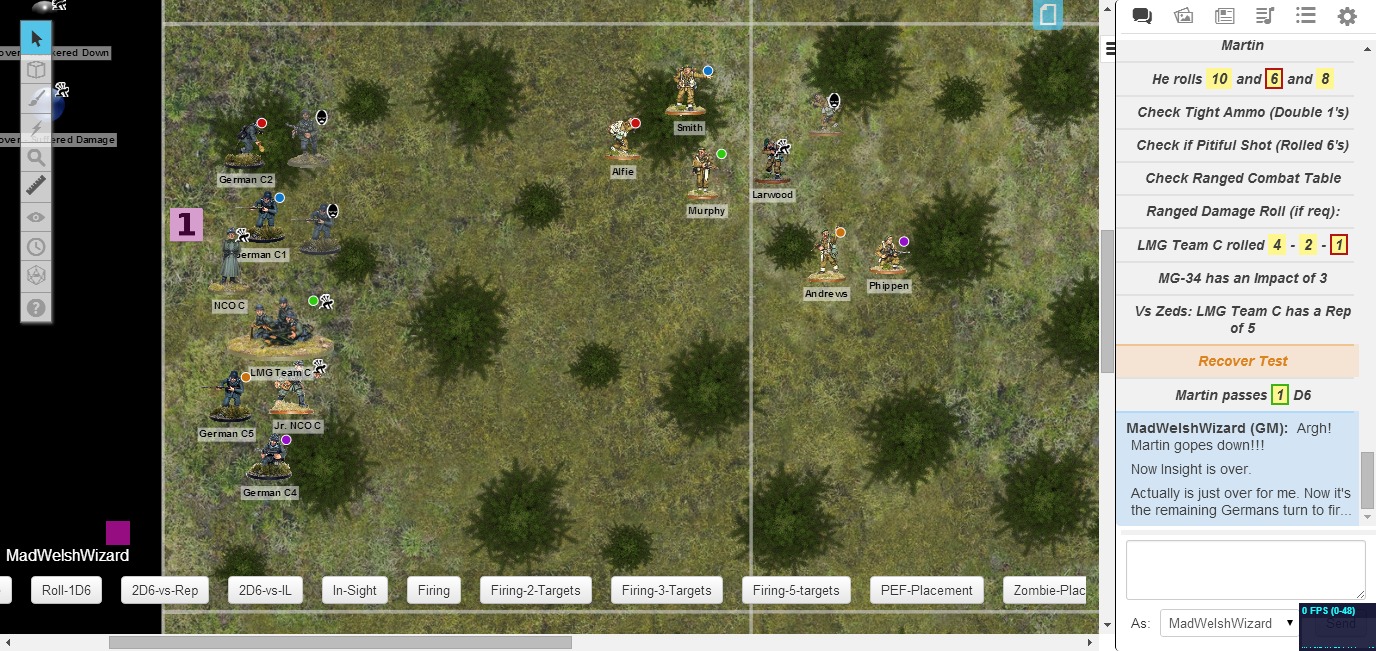
And when the dust settles…
Poor old Phippen is a goner and two more Germans are down!
Now I believe it’s time to roll for Man Down checks? Nothing earth shattering happened, all my guys passed as did the Germans.
I won the next activation so my guys high tail it into the middle tile to try and get out of range of the Germans.
Plot: This area is a lot hotter than the brass thought it was, Lt Col. Andrews had to get back with the information…
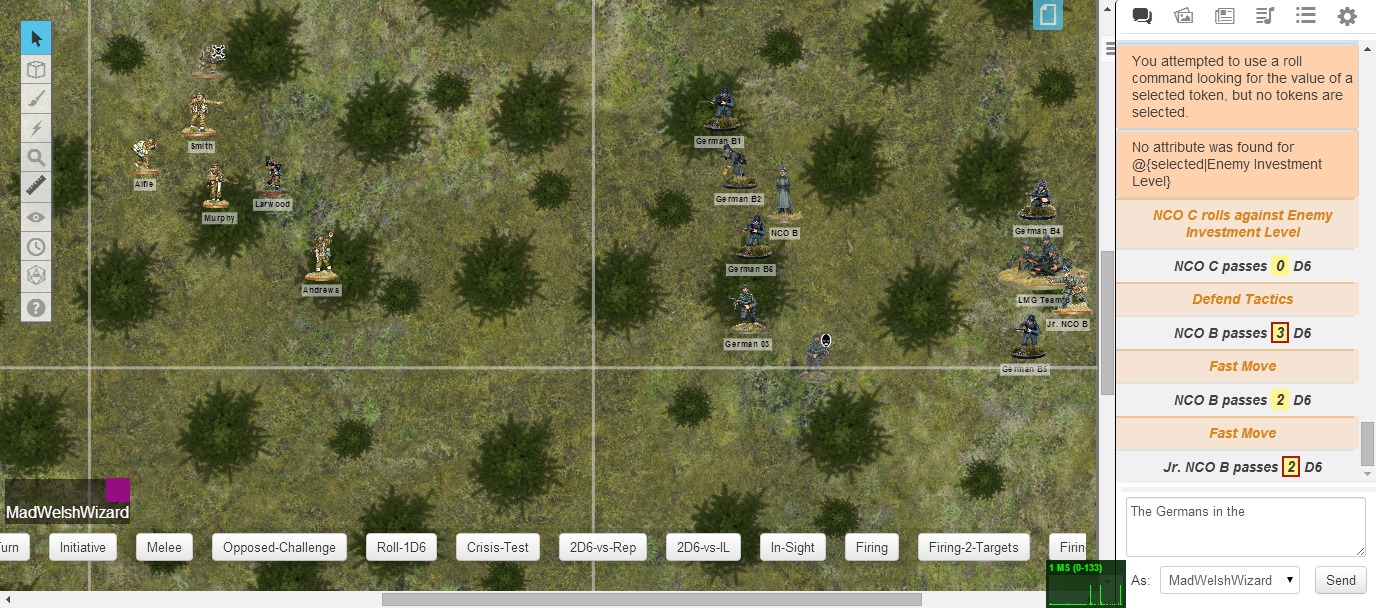
The new German Squad (imaginatively titled C) needs orders… They are on Patrol! They pass 0d6 and convert to a fighting withdrawal and move directly off the tabletop from whence they came. Plot: Definitely a show of force, those jerries are hiding something.
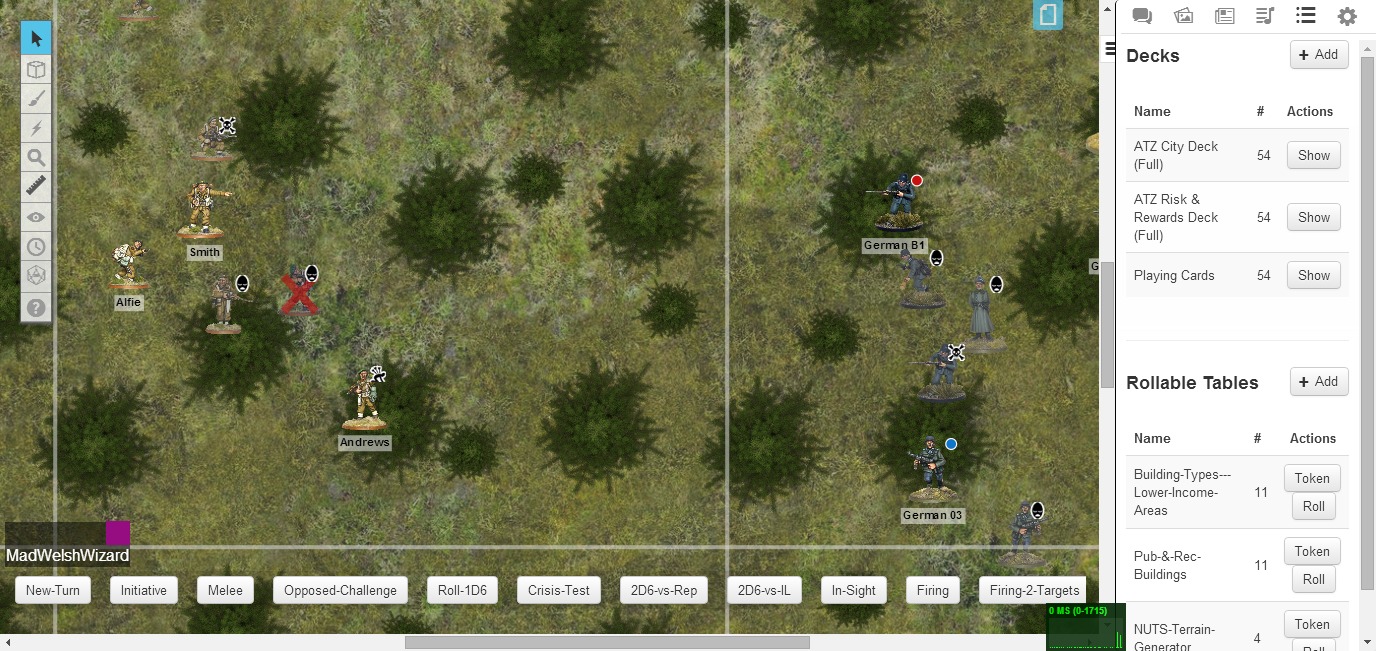
The Germans in Defensive tactics mode on the left pass 3d6 so split into two, trying to get closer with one side flanking me. The group with the NCO moves to within 12” of Andrews which I believe means triggers another In Sight. They move 2” closer. Andrews, Larwood and Murphy are in LOS of the Germans (Smith and Alfie are just out of 12” so in Woods that means out of LOS) so they form a mini group for this insight.
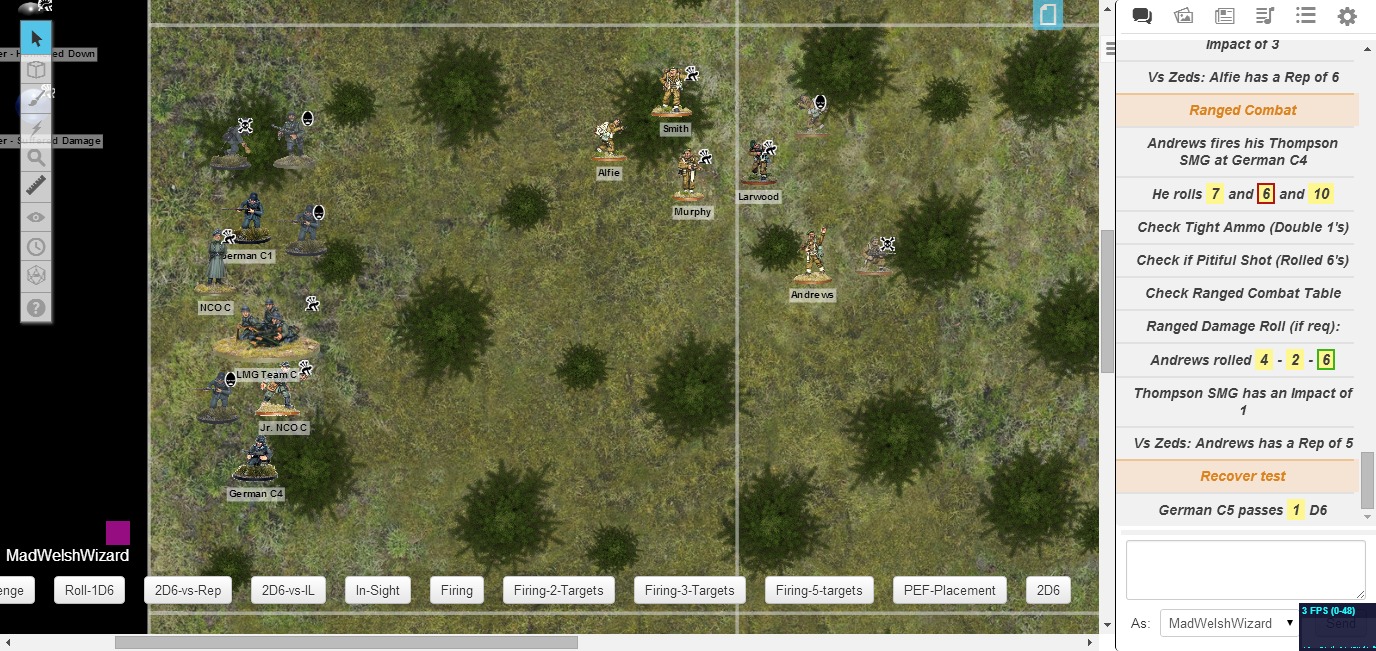
I win (3-2), so assigned shots to my 3 brave lads…
Andrews takes the enemy NCO out of the fight!!!! Larwood took out another German. Sadly German B1 with his SAR took down Murphy!
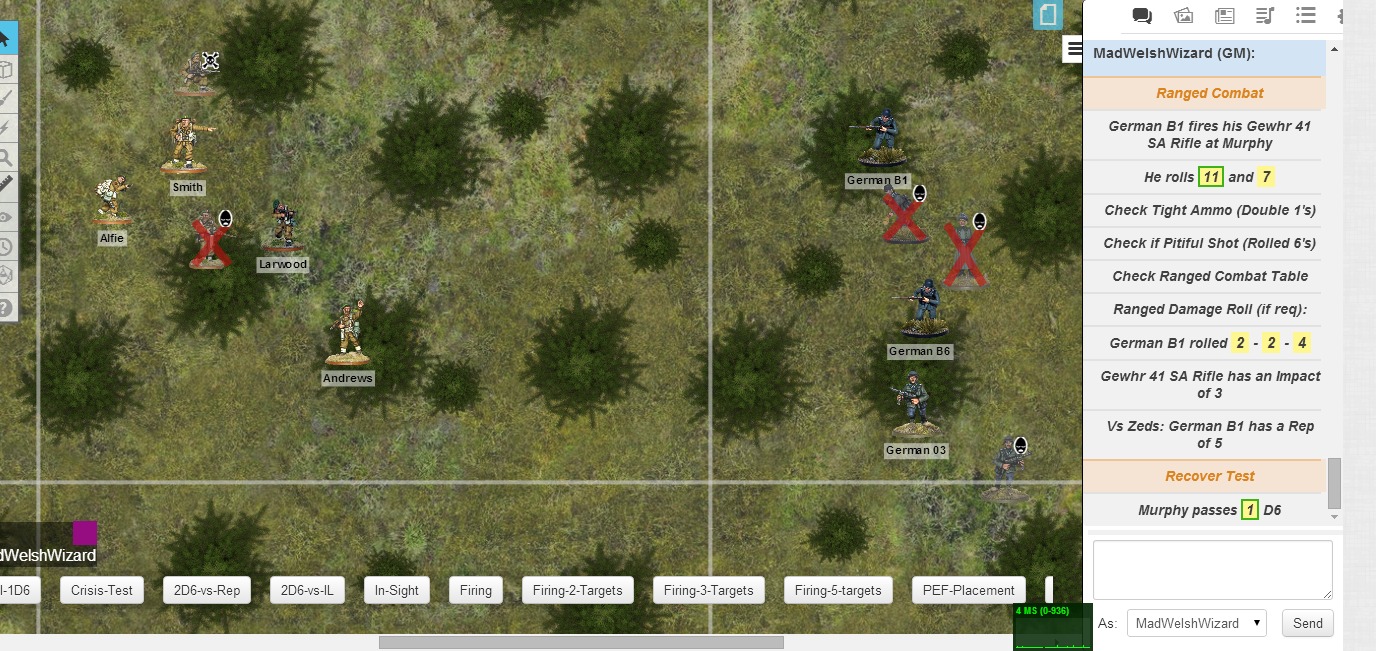
I also realised the big red crosses in Roll20 highlight recent casualties better for these pictures :)
Now time for man down Crisis tests… Not one failed a test. So now we switch back to normal rounds. The Germans have very little move left but they can fire.
The Germans miss with their opening salvo! Andrews choses to Pass 2d6 and return fire. Larwood returned fire at B6 and got an OD result!
Now the other group of Germans try to flank me. Which side…(quick dice roll and table lookup) They’re flanking to my left, trying to drive me off the board.
Plot: They really want me gone as soon as possible, they must prefer me to run away than risk seeing something I’ve not yet noticed…
Next turn. Worst possible initiative. My guys rolled a 6 and cannot activate this turn…
A German shoots Andrews! I got a OOF result in the Recovery Test. Time to read up on Star Advantages. Right, first up Star Power. Rolling 5D6 in an attempt to reduce damage. 4-3-6-6-5 Reduce damage by one level to Carry on but Knocked Prone. And in typical bad dice rolling fashion I loose 2 of my Star Power for the rest of the scenario.
[[ I played it that NP’s would not target the nearest non prone soldier. ]]
Argh! Larwood goes down too! And that’s it for this turn as no Germans move.
[[ Realised I have not been getting up from Prone correctly. ]]
New turn and Another 3-4 (total 7) rolled. Possibly more German Reinforcements!!! Phew, a 4 was rolled, nothing appears.
German activation. Defend tactics roll, they remain in place and fire. No non prone soldiers in LOS.
So is my go. Would they fire at the prone form of Andrews. I decided they wouldn’t. So nothing was in range and LOS.
Time to run like hell. Fast move check… Passed 2D6 !
Nothing else of note occurred as defensive Germans stayed in place.
End of mission, a success but with heavy potential losses.
~
Survivors
Lt Col. Andrews
Alfie
Smith
MIA (Possibly Still Alive)
Roy Martin
Nicholas Murphy
Oliver Larwood
Philip Davison
Geoff Hornby
Role of Honour
John Edwards
Stephen Phippen
~
Next Time
I go through the After the Battle section to see who returns to the squad and if my victory has affected the overall Operation and I also expand my characters using the Chocolate & Cigarettes rules.
~
![]()
Links and More Information
A cracking highly active forum where you can see more AARs from the new version of NUTS written by the author himself.
The latest news and releases from 2 Hour Wargames, 2 Hour RPGs and 2 Hour Sports.
The place to get hold of the rulesets.
~
Webmaster's Notes
This After Action Report was written for Orcs in the Webbe and was first published on the 20th May 2014.
~