![]()
"Short Fuses at the Bridge"
or
"A Cannon for Your Kegs"
A Flintloque Scenario by Mark Lesny
Captain Viktor Von Grossedogge and his brave sappers have been sent on a mission to destroy a criticial bridge deep behind enemy lines. However, the Werewolves and Centaurs of the Duchy of Coltz tasked with defending the bridge are already in play... and they have a cannon.
~
Werewolf Lieutenant Jakub Howlski of the 5eme Coltz Foot Artillerie stood beside Little Ludmilla, his section's six pound cannon, as he watched the road and meadow across the Brandywine River. His section and the squadron of Centaur Lancers across the road had been charged with guarding the bridge. While the river could be forded without the bridge, the ooze at its bottom was far too soft for the heavy ox carts that travelled the road bringing cannon balls and other needed supplies to the front lines. In the distance Jakub could see a small cloud of dust approaching along the road. Probably more ox carts, he thought. There was little chance that the enemy would sneak this far behind the lines to attack the bridge. Just in case though, he took out his spyglass to get a better look. Behind him Jakub could hear the gunners talk as they roasted a brace of rabbits that the Sergeant had snared. As usual the newest recruit, Private Aleksy Pawlak, was asking questions.
“Sergeant, in basic training they said that we would sometimes have to howl in battle, but they never explained how to do it. How do I know if I can howl right?”, asked Aleksy.
The sergeant laughed and then replied, “Every Werewolf howls the right way. It's something we are all born with. What's important is not how you howl, but when. What did they teach you about that in basic training?”
“That we need to howl together, and that we should only howl when the officer in charge tells us to,” answered Aleksy.
“Good, that's really all you need to know about howling in battle,” said the sergeant.
“When do the officers give the order to howl?” asked Aleksy. “Is it right before we charge?”
“Sometimes,” answered the sergeant. “The howl touches something deep inside the enemy and shakes him up for a moment, so it's best used just before some event that will test his courage. Of course, a cannon crew usually does not charge the enemy, so sometimes we howl for the benefit of others. Imagine the effect of a howl just as the Centaur Lancers charge into battle.”
Jakub looked again carefully to be sure and then put the spy glass back into his pouch. Turning to face his Werewolves, he said, “Lads, best take the rabbits off the fire for a bit, and get Little Ludmila ready to welcome our next guests. Ostarian soldiers are bringing us kegs, but I am betting that none of the kegs have fine Krautian Bier in them. Aleksy, run to the Lancers and tell them Ostarian infantry are coming towards us from across the river. Then hurry back. I don't want you to miss your first chance to howl in battle.”
Scenario Forces
Small skirmishes for a bridge like this can occur almost anywhere on Valon. Feel free to substitute sections from your collection for those listed below. Of course, it never hurts if the factions involved have a long-standing grudge match, like Dogmen and Werewolves.
Each faction has two sections. These sections need to be allies, but they could come from different countries, e.g. the Ferach and the Todoroni. The defenders of the bridge need an artillery and a cavalry section. The attackers need a section of sappers and a section of infantry. For those using points, each side has up to 600 points to spend, which includes both sections, along with their skills, traits, and flaws.
The Grand Duchy of Coltz (Ferach Empire):
5eme Coltz Foot Artillerie
Lieutenant Jakub Howlski (Experienced / Gunner / Small Werewolf). Standard Pistol and Sword.
Sergeant Gorski (Average / Gunner / Small Werewolf). Powder & Ball Scoop (large improvised weapon) and Knife.
Corporal Dagrowlski (Average / Gunner / Small Werewolf). Quicke Match (large improvised weapon) and Knife.
Private Machewski (Raw / Gunner / Small Werewolf). Venter's Bucket (small improvised weapon) and Knife.
Private Barkowski (Raw / Gunner / Small Werewolf). Rammer's Swab (large improvised weapon) and Knife.
Private Aleksy Pawlak (Raw / Regular / Small Werewolf). Knife.
Private Grawoofski (Raw / Regular / Large Werewolf). Knife. Hauls Ludmilla as needed.
Private Pawlowski (Raw / Regular / Large Werewolf).Knife. Hauls Ludmilla as needed.
Little Ludmila, a Standard 6 lb Field Gun
You should pick a reputation for your officer. You may pick 3 Skills, 3 Traits, and 2 Flaws for this section, and you may roll for Wylde Magicke for each character.
Kasper's Raiders of the 5er Uhlans
Lieutenant Kasper Piotrotski (Experienced / Cavalry / Centaur). Standard Pistol and Sword.
Sergeant Szepranceski (Average / Cavalry / Centaur). Standard Pole (large improvised weapon) and Knife.
Corporal Whoazinak ( Average / Cavalry / Centaur). Lance and Standard Carbine.
Private Nowhickeri (Raw / Cavalry / Centaur). Lance and Standard Carbine.
Private Ostrotski (Raw / Cavalry / Centaur). Lance and Standard Carbine.
You should pick a reputation for your officer. You may pick 2 Skills, 2 Traits, and 1 Flaw for this section, and you may roll for Wylde Magicke for each character.
The Empire of Ostaria (Grand Alliance):
Frei Corps Von Chum
Lieutenant Martin Jagthund (Experienced / Light / Dogman). Ostarian Repeating Air Pistol and Sword.
Sergeant Schweinehund ( Experienced / Light / Dogman). Ostarian Repeating Air Rifle.
Corporal Kleinermops (Average / Light / Dogman). Standard Pole (large improvised weapon) and Knife.
Private Haltenhund (Average / Light / Dogman). Ostarian Repeating Air Rifle.
Private Angstdogge (Average / Light / Dogman). Ostarian Repeating Air Rifle.
Private Schlafenhund (Average / Light / Dogman). Ostarian Repeating Air Rifle.
Private Schnopsmops (Raw / Light / Dogman). Ostarian Repeating Air Rifle.
Private Lautpudel (Raw / Light / Dogman). Ostarian Repeating Air Rifle.
Private Bierhund (Raw / Light / Dogman). Ostarian Repeating Air Rifle.
Private Fertigmops (Raw / Light / Dogman). Ostarian Repeating Air Rifle.
Private Blaublut (Raw / Light / Dogman). Ostarian Repeating Air Rifle.
Private Vorsicht (Raw / Light / Dogman). Ostarian Repeating Air Rifle.
You should pick a reputation for your officer. You may pick 5 Skills, 5 Traits, and 2 Flaws for this section, and you may roll for Wylde Magicke for each character.
13th Venna Engineers and Miners
Captain Viktor Von Grossedogge (Experienced / Engineer / Dogman). Hugel Pistol and Sword. Viktor is mounted on a light horse.
Sergeant Hierdamit (Average / Sapper / Dogman). Standard Pistol, leading the pack horse.
Private Schwartzhund (Average / Sapper / Dogman). Knife and Powder Keg.
Private Graupudel (Raw / Sapper / Dogman). Knife and Powder Keg.
Private Bluthund (Raw / Sapper / Dogman).Knife and Powder Keg..
Daisey, the Pack Horse (being led by Sergeant Hierdamit) 2 Powder Kegs
You should pick a reputation for your officer. You may pick 2 Skills, 2 Traits, and 1 Flaw for this section, and you may roll for Wylde Magicke for each character.
Scenario Map and Set Up
The playing area should be four feet long (West to East) and three feet wide. This scenario takes place in a meadow with a few scattered trees. A river, about 10 cm wide, runs parallel to and 30 cm from the Eastern edge of the board. A dirt road, about 6 cm wide, crosses the length of the field. The road crosses the river at a stone bridge, about 12 cm long and 6 cm wide. Southeast of the bridge there is a small hill. The placement of these items is shown on the accompanying map. The river acts as bogging terrain and is the only terrain item that affects movement.
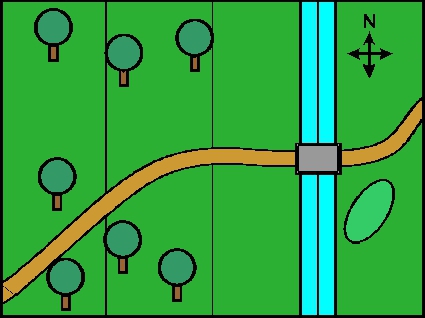
The Werewolf gunners should be set up on the hill, placed around the cannon to show that they are already manning it as explained in Grapeshotte pages 8 – 9. The Dogmen infantry section should then be deployed anywhere within 30 cm of the Western edge of the board. Next, the Centaurs can be placed anywhere East of the river. Lastly, the Dogmen engineer, sappers and pack horse should be placed within 15 cm of the Western edge of the board.
Scenario Objectives and Game Length
The Empire of Ostaria (Grand Alliance)
The Emperor himself issued your orders. Take your sappers and a section of militia deep behind the enemy lines and blow up the bridge over the Brandywine river. Luckily, the general said that he had misplaced the militia, and chose a section of the renowned Frei Corps Von Chum to replace them. Even with such excellent light infantry, your task will be difficult if the bridge is well defended.
You have 10 turns to carry the unstable black powder kegs to the bridge and blow it up. If the bridge is destroyed, the Ostarian Empire wins at the end of the current turn. It does not matter which side inflicts the final damage, or whether anyone from Ostaria is still standing on the table. If defenders are eliminated, but the bridge is still standing, the game ends in a tie. After turn 10 Ferach reinforcements arrive to reclaim the bridge.
The Grand Duchy of Coltz (Ferach Empire)
Your sections have been charged with defending the bridge that crosses the Brandywine. You thought this would be a dull assignment, since no one would attack this far behind the lines. To your pleasant surprise, you are going to see some action after all. Even better, the enemy are Ostarian Dogmen!
If the bridge is still standing at the end of turn 10, then the Grand Duchy wins, unless both your cavalry and artillery sections have been eliminated. In the latter case, the game ends in a tie. Ludmilla, the cannon, does not count as a member of your force for this purpose.
Special Rules for this Scenario
Here are the special rules for this specific scenario. In all cases these listed rules supersede any conflicting mechanics in the Flintloque 3rd edition rules.
Sarge, the mud's awful deep here: Troops, including cavalry, can ford the Brandywine river anywhere along the map. The river counts as bogging terrain. Gun carriages, and other transports that use wheels, can only cross the river via the bridge.
Destroying the bridge: The stone bridge that spans the river was built about 100 years ago by the local farmers so that their ox carts could cross the river. For this purpose it is well made, but it does not have the structural integrity of a bridge designed for military use. In Grapeshotte terms, the bridge is one section long and has 40 IRP's.
Those kegs are a might touchy: The Powder kegs are very unstable (Grapeshotte, page 22). If they are not carried slowly, there's a good chance that they will explode. Also note, sappers move more slowly than other troop types (Grapeshotte, page 23). In addition, carrying kegs has the following effects on combat.
If a soldier or pack horse carrying a powder keg is hit by artillery, the keg immediately explodes.
If a soldier or pack horse carrying a powder keg is wounded in melee or by personal firearms, roll 1D10. On a 1, the keg was struck hard instead and blows up.
If a soldier or pack horse carrying the keg is killed, knocked down, or drops the keg, roll 1D10. The keg explodes on a 6+.
Whenever a keg blows up, check if any other models or the bridge are under the blast template. Any kegs or models with kegs under the template automatically explode, each using its own blast template that might catch still other models.
Whoa, Daisy, Woe!: Daisy starts the game with two large powder kegs on her back. Her movement rates and stats are the same as a Light Horse. Like the sappers, Daisy can carry kegs safely at a Slow March or less, but her Slow March is faster than that of the Sappers. It takes one action to unload a keg from Daisy. Sergeant Hierdamit is leading Daisy. While Daisy is carrying the kegs, it's Daisy's pace, not the Sergeant's, that matters for keg stability. In other words, the Sergeant can Double March (but remember sappers move slower than other troop types) while leading Daisy, who is traveling at her Slow March pace, without risk of having Daisy's kegs explode.
Scenario Requirements
In order to use this scenario you will need some normal wargame equipment such as a playing area, terrain, dice and miniatures along with rosters, tokens and so on. In more precise terms the central needs for the scenario once the playing area is set up are as follows:
5026 Flintloque 3rd Edition - Death in the Snow
5028 Flintloque 3rd Edition - Bier & Bones
These game books contains all needed rules and army materials fpor both forces along with background for each theatre of the Mordredian Wars.
5027 Grapeshotte
This expansion book contains all the rules needed for artillery, engineers and sappers.
5eme Coltz Foot Artillerie
57811 Ferach Werewolf Artillery Crew (6 Little Werewolves and 2 Big Limber Werewolves)
59507 Ferach Heavy Cannon (One Field Gun Kit)
Kasper's Raiders of the 5er Uhlans
57808 5er Uhlans de Coltz (10 Centaur Light Lancers - only 5 required)
Frei Corps Von Chum
56504-U Frie Corps Von Chum (12 Ostarian Dog Light Infantry)
13th Venna Engineers and Miners
56537 Dogmen Engineers (1 mounted Dogman Engineer Officer on Horse, 1 fully laden Pack Horse, 1 case of bombs with powder barrel and rope and 4 Dogmen sappers on foot.)
These miniatures provide all the characters needed for playing the scenario and of course they can be almost endlessly re-used for other adventures.
All the above miniatures are available now from Alternative Armies webstore.
Designers Comments
This scenario is for 2 to 4 players, although you could play it with the solo rules. Because each faction has two sections, a veteran player could team up with a new player on one or both sides to introduce them to Flintloque.
For the Ostarian player, this scenario can seem like a Forlorn Hope. The sappers and Daisy have to trudge slowly across the field in the face of cavalry and artillery. Blowing up the bridge requires at least two kegs of powder, unless the Werewolves hit it several times with their cannon. Success depends on your light infantry. Can they distract and eliminate the enemy fast enough with their repeating air rifles for you to get at least two kegs to the bridge? Daisy is faster then the sappers, so you might want delay bringing her forward until it is safer.
For the Werewolf player, this scenario is also tricky. The enemy has a large light infantry section, and you only have a small Calvary section and a cannon that fires, at best, once a turn. Much depends on both when and how you use the cavalry, and what targets you select for the cannon. When the Centaurs charge, consider spending a command point to charge as a coordinated action. Think twice about using the Centaurs to charge the sappers and the pack horse. They might win the combat only to be blown up by a dropped powder keg. For such targets, the Centaurs would be better off using their personal firearms. Be careful where you deploy the cannon if you are planning on using caseshotte.
~
Webmaster's Notes
This article was originaly published on Alternative Armies' content portal, Barking Irons, and is reproduced here with permission.
~